Segments allow admin users to group people based on attributes such as age, gender, registered season, and session. These groups help improve efficiency and support targeted marketing analysis. Segments are accessed from the People tab.
Admin users can:
- Create up to 100 custom segments by season, session, or people attributes
- Filter and view registrants who match saved segment criteria
- Generate reports containing registrant data
- Send targeted email campaigns to people in a segment
Admin restrictions:
- Instructors or Contacts: No access to Segments
- Limited user role: No access to Segments
- System users (other than Limited user role) with access to specific seasons or sessions can only view people filtered from seasons and sessions visible to them
SETTING UP A NEW SEGMENT
Use segments to filter people based on seasons, sessions, and additional attributes.
The following examples show on how to set up the Segment conditions for specific scenarios: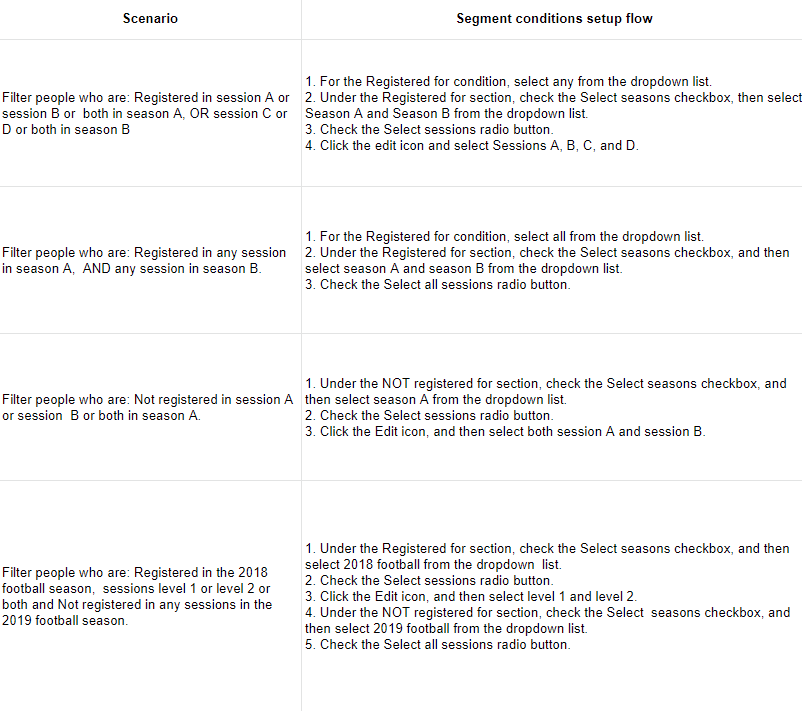
COPYING A SEGMENT
Users can create a new segment by copying an existing segment then change the segment settings as required.
EDITING A SEGMENT
Users can edit an existing segment's name and filter conditions by selecting the required segment and then click Edit button and then click Segment setup tab.
PINNING A SEGMENT
Users can pin up to 5 frequently-used segments on the left navigation pane by hovering the cursor over a segment, and then clicking the pin icon. Pinned segment are listed for quick access under the People tab, then Segments section.
Once the segment is pinned, on the All segments page, a pin icon in blue will be displayed next to the segment name. To unpin and remove the segment from the left navigation pane, click the blue pin icon.
DELETING A SEGMENT
Users can delete one or more segments by selecting the required segments then click the Delete button.
EMAILING PEOPLE IN A SEGMENT
If the segment contains registrants, users can send targeted emails to all registrants matching the segment setup by clicking the segment then click Email segment button. The new email workflow is displayed, with the registrants in the segment listed as recipients.
EXPORT REPORT
If the segment contains registrants, users can export selected registrants information to an Excel file by clicking the segment then Export report button.
In the Choose columns pop up, you can customize the columns based on what you preferred on the report.
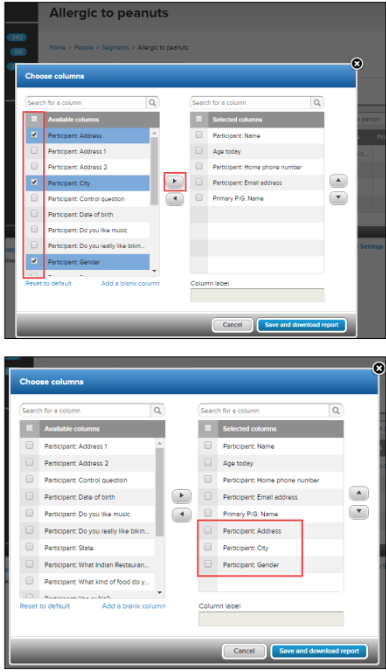
To download the Excel file, click Save and download report. Selected columns are saved for future use.
Note: If custom question columns are included, future exports display custom questions based on the logged‑in user’s access restrictions
- Click People tab
- Click All segments
- Click Create your first segment
- In Basic settings, enter the Segment name
- Under Segment conditions, check season checkboxes and session radio buttons, then select seasons and sessions from dropdown lists
- Note: At least one season must be selected before saving a segment
- To add filters to the segment, click the + Add conditions link and select the required filter criteria from the dropdown list. The filters are the following:
- Birthday
- Custom questions (Note: Only custom questions belonging to filtered seasons are listed. Each segment can have up to 3 custom questions, and each question can only be selected once)
- Date of birth
- Gender
- Registration date
- Click Save
The following examples show on how to set up the Segment conditions for specific scenarios:
COPYING A SEGMENT
Users can create a new segment by copying an existing segment then change the segment settings as required.
- From the database, click People tab, then on the Segments section, click the All segments button.
- Check the segment that needs to be copied.
- Click Copy.
- Note: Users can only select and copy one segment at a time. If 100 segments already exists, then a warning message will pop up to prevent the copy.
- On the Copy a segment pop up, enter the new Segment name and then click Yes.
- To change the new segment's condition setup, from the People tab, click All segments button then click on the newly copied segment name then click Segment setup tab.
EDITING A SEGMENT
Users can edit an existing segment's name and filter conditions by selecting the required segment and then click Edit button and then click Segment setup tab.
Users can pin up to 5 frequently-used segments on the left navigation pane by hovering the cursor over a segment, and then clicking the pin icon. Pinned segment are listed for quick access under the People tab, then Segments section.
DELETING A SEGMENT
Users can delete one or more segments by selecting the required segments then click the Delete button.
EMAILING PEOPLE IN A SEGMENT
If the segment contains registrants, users can send targeted emails to all registrants matching the segment setup by clicking the segment then click Email segment button. The new email workflow is displayed, with the registrants in the segment listed as recipients.
If the segment contains registrants, users can export selected registrants information to an Excel file by clicking the segment then Export report button.
To download the Excel file, click Save and download report. Selected columns are saved for future use.